Showing posts with label vermont bushcraft. Show all posts

Sunday, May 5, 2013

A Small Mess Kit for my Pack?

Not to long ago I put together emergency packs for the kids and wife to keep in their vehicles or to have if they are going off on a hike. The backs contained very basic supplies that met the needs for protection against the elements, filter/carry water, fire.
While going through my pack I noticed I had left something out that will be needed. What were we all going to do when it was time to break out the soup or oatmeal? Carrying water was covered, but we would need to find something to mix the water and oatmeal. Darn... All that planning and find I forgot something. This had to be rectified at once. I perused Amazon, e-bay for mess kits. What I landed on first was a nice little stainless cup.

This cup was found on Amazon for less than 15$ with free shipping
at the time. Feels well built. I have not got out to make my coffee or
chaga tea yet. Hope to do that soon.

So this cup fills the need for putting together a quick instant meal.
16 Oz. is good enough for a pack.


Then I found this at the local W**mart. Now this one looks very promising and in keeping with a kit that is compact. Check these pics out. This kit is made by Stanley. It is stainless steel and comes with a couple of insulated plastic cups.

 20 Oz will boil enough water for cup-o-soup or instant oatmeal. And keep the other cup free to make coffee.
 A vented lid to keep things under control and minimize a mess, maybe.
These are the insulated cups that come with the kit. Plastic and insulated to keep the contents cool or hot.

As you can see the Stanley adventure kit sits nicely into the other cup. Makes for a nice compact kit for the pack and light weight as well. W**mart had the best price for the kit, under 15$. While I did check online prices were much higher.
I think this is an awesome find for the pack.


Enjoy,

Tuesday, March 5, 2013

To Make A Knife...

I was doing some reading about knife making, and then to add to the process I watched several videos on Youtube. Found some really cool bushcraft websites, here is one of the many out there: Making a Bushcraft Knife.

I did not have much in the way of steel. I poked around the shed and found one of the old mower blades. So far so good. I noticed that the blade has a turned up corner, cut off that section. I don't have any way to heat up the metal to flatten. At least not yet. I do have plans to build a small forge very soon. Once again Youtube has plenty of videos on building a forge.

As for tools here is what I used:

Hacksaw
Bench grinder
Belt sander (hand held, need to get a bench mount)
Dremel tool

I need to build a jig to get the blade bevel right. This is a learning experience so the first round will not be so good. Here are a few pic's of the project.

Need to come up with some scales for it. I will try to root up something out back in the woods. Maple, Birch, some decent hardwood. A small knife, but something to test out and learn from.


 Holes need to get drilled for the scales and lanyard before the tempering.


 The spine is approx. 3/16" thick. It will make a nice sturdy knife once it gets tempered.


More to follow as I gather up and build what I need to work through this project.


Enjoy,

Wednesday, September 5, 2012

To Make A Sheath...

I recently picked up a few Mora knives. To be specific I got hold of a:
                                 hook knife,

                                 carving knife,

                                 bushcraft series knife.

I am happy with these knives so far. I have heard or read only great comments about these tools. I do forsee a fun time trying to sharpen the hook knife, but nonetheless I am happy and having fun.

I made a pot stirring spoon with a piece of white cedar. Still needs to be sanded. The latest spoon is a smaller one carved out of birch. Coming along well, still much more to do.
The carving knife came with a decent plastic sheath to protect me and the blade while not in use. The hook knife needed something as it came with no sheath. As a result I felt I needed something to safely pack the knives. Many moons ago I cam across some scrap leather. Not good for much as the thickness was uneven and there were some holes in the thinner part of the pieces. But, I figured I would find use for the leather at some point. I could use it to patch something or in this case make a nice little sheath.
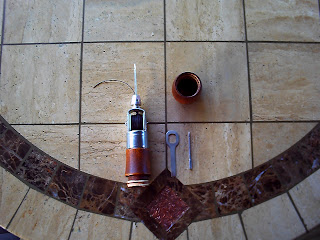
What would someone need to sew leather and not get to carried away with poking holes in ones fingers? How about a sewing awl? I think these gadgets are wonderful and an absolute must for the pack or having around the homestead. Having one of these awls lets you fix canvas, leather, and just about any heavy fabric. Just be sure to have some of the heavy duty thread that come with it. Sewing awls can be found at Amazon, e-bay, etc. Just about anywhere. Prices are reasonable, but be sure to shop around. A sewing awl that I purchased came with two needles, wrench, one spool of thread. The wrench and needles stow away in the handle when not in use. Be sure to purchase extra thread, needles.


The sheath I made is wide enough to accommodate both carving knives. This allows me to keep them together and not take a chance and lose one.


Another one of those tools that is perfect for any kit.

Enjoy

Tuesday, August 28, 2012

A Belt...

Having a belt serves so many purposes. Primarily a belt is used to hold up your pants. But, on occasion your belt can be used as a tool.

1. Emergency tourniquet to tie off a bleeding limb.
2. Hang a piece of gear from a tree.
3. Tie up poles for an emergency shelter.

The list goes on and on. It just depends how creative you are and what you expect to accomplish. I use a belt for the good ole' keep the pants up. Most of the time a canvas type belt with a cinch buckle works for me. If I am required to wear a suit or some sort of casual business I will use a leather belt.

But, when I head out into the woods I am not really inclined to have all sorts of gadgets hanging on the same belt I use to hold up my field pants or shorts. Just adds to much weight and the average belt will fold over. This makes for an uncomfortable day as the average belt is one inch in height.

What I like to use is something called a riggers belt. These belts are normally one & three-quarters inch in height and thickness is almost a quarter inch. Not as tall as the USGI web belt. But, they will support what ever I need to place on them. For example some holsters & knife sheath(s) will not fit the USGI web belt, but will readily slide on the the riggers belt. The riggers belt also has a nifty little option to allow the user to repel or let's say be recovered. This loop is neatly tucked away and strapped down beside the cinch buckle.

I bought a Blackhawk belt which seemed to shrink... Well, rather I seemed to expand. I found this belt to be very well made, but thin in thickness. So, I had to find one that "stretched" to my needs and was a bit more rigid. I picked up an Emerson which is thick compared to the Blackhawk and sits really well. I don't have it loaded with tons of stuff; just a couple items. Riggers belts can be had on e-bay or Amazon. But, if you are on a budget the e-bay deal is tough to beat.

** Keep an old leather belt in your pack. You can use it to sharpen your knife. Check out this Youtube video by BushcraftOnFire:

Sharpening A Knife Without Tools

Enjoy

Saturday, August 25, 2012

A Spoon...

I came across a couple of videos on Youtube about carving or whittling a spoon. It is not as easy as you think. Years ago I had to make one to eat with. Mine turned out to be more like a scoop. I found out in the videos that there is something called a hook knife. So, I had to order one and see how well it worked out. Making a spoon with a knife can be done, but the hook knife is definitely handy.
Yesterday was a really nice day. I took a break from working on the bow drill and decided to test out the hook knife. Here is a video on the spoon I created. More like a spoon to stir the pot, but looks fairly good.

http://www.youtube.com/watch?v=pLuN9T1DNhg

The two video I came across are here BenOrford & Bushcraftbartons.

Once again if you don't practice don't expect to get the task done. Even if you don't have the hook knife make something. Remember to practice knife safety as a cut can ruin your day.

Enjoy.

Tuesday, August 21, 2012

Starting a Fire...

I have been away from doing anything in the woods for some time now. So I decided to get back where it is quiet and listen to the critters. Started to get refreshed on some bushcraft skills. First up was trying to start a fire. Pretty straight forward, no matches or lighters. I used the fire stick for one and a magnesium stick for the other.
Next on the list is to create a bow drill.

Here are a couple of links to my youtube channel where I captured the process.

Used cotton balls with a thin layer of petroleum jelly.
http://www.youtube.com/watch?v=RVvb_B-p3HU&list=UUJvBW3eoN49oXKjRgPIRc-Q&index=3&feature=plcp

I used shaved cedar bark, pine pitch, and some magnesium for this one.
http://www.youtube.com/watch?v=J2ZrjG-JEk4&list=UUJvBW3eoN49oXKjRgPIRc-Q&index=2&feature=plcp

Getting out there and practicing is most helpful. Never know when you need a fire.

More to come....